


To sign up for Meridian’s Free Newsletter, please CLICK HERE.
Our friend, Alice Osborne, came up with this neat idea. For her, it was a lunch box idea: Make the salad at home, stick it in a Mason Jar, and then in a chilled lunch box.
When it’s time for lunch, shake the salad to distribute the dressing through the salad, and put it on a plate.
The genius of this method is its convenience. That and the fact that your greens don’t get soggy sitting in the dressing.
But I’m thinking picnics and outings, not boxed lunches. It’s so convenient to pack big or little jars–for group and individual servings–in a picnic or camping cooler. Ready to go–fresh and with no leaks.
But read on to see what Alice has to say.
-Dennis Weaver
Special Meridian Offer

I love flexible cutting mats. Use this three-color set to protect against cross contamination by using green for vegetables and fruits, yellow for seafood or chicken, and pink for red meats. I like the multiple mats just for convenience—the tomatoes on one and onions on another. You can bend them, flex them, and for easy transport to your bowl or pan. And they won’t retain odors or dull knives. When you’re through, stick them in the dishwasher.
Get this three-color set of flexible cutting mats for only $1.00. Reg. $7.99 Expires 6/15/2016
Don’t miss Saturday’s Special: New! Flat Iron Skillet Biscuit Mix! Only $1 Expires 6/15/2016
Salads in a Mason jar–this isn’t just a cute idea—it’s actually a very practical and a healthy, on-the-go lunch option, and you can use the same jar every day until the end of time (or until it gets dropped and breaks). So, if you or a member of your family pack a lunch, you’ll love this new twist!
Necessity was the mother of my invention. I learned the hard way that pre-dressed greens quickly turn soggy. So I got into the habit of bringing a separate container of dressing along when I’d pack green salad for picnics or for brown-bagging at work. But about two years ago, after some experimenting, I figured out a more convenient way of packing salad by taking a layered approach using a wide-mouthed quart-size canning jar. The cylindrical shape of the jar is perfect for layering and the tight seal keeps the veggies nice and fresh.
First, let’s look at the typical tossed salad choice. I add my chosen dressing to the bottom of my jar, then all chopped vegetables (those I have on hand, which are usually tomatoes, cucumbers, green onions, celery, mushrooms, and bell peppers). Next, I top it all off with a layer of greens and cover the jar. Just prior to serving, I give the container a good shake to mix everything up.
Three things I’ve discovered about this salad approach: 1) You don’t want to pack the jar too tightly—space is needed for the dressing to thoroughly coat the fixings. 2) While it is possible to eat the salad straight from the jar, it’s less messy and easier if you pour the salad into a bowl or onto a plate. And 3) just about any salad works with this canning jar method.
For instance, how about those popular cold pasta salads? One of my favorites calls for artichokes and tortellini. The recipe I use makes enough for 5 people (5 quarts-worth) and takes only about 20 minutes to prepare (plus 8 minutes for the tortellini to cook). What is really nice about this recipe is that these salad jars can be made up to 5 days ahead of time and stored in the refrigerator. This has been an exceptional salad for taking on picnics. Here’s the recipe:

ARTICHOKE and TORTELLINI CANNING JAR SALAD (serves 5)
Ingredients
5 quart-size wide-mouth canning jars
2-3 tablespoons Italian dressing per jar, or to taste
1 quart cherry tomatoes, halved
1 red onion, chopped
2 cans quartered artichoke hearts, cut in half
4 ounces dried cheese filled tortellini; cooked according to package directions
8 ounces feta or freshly grated Parmesan cheese
5 cups bagged spinach salad (or other baby greens—arugula, etc.)
Directions
Place dressing in each jar. Then divide the remaining prepared ingredients evenly among the jars: tomatoes first, then onion, artichokes, tortellini, cheese, and finishing with spinach. When ready to eat, give the salad a shake and pour into a bowl.
Here’s another wonderful salad that works well layered into a canning jar and can also be made ahead of time and stored in the fridge until ready for use:
BEAN and KALE SALAD (serves 5 to 6)
Ingredients
5 to 6 canning quart-size wide-mouth canning jars
5 tablespoons red wine vinegar
7 tablespoons extra virgin olive oil
1 red onion, chopped
1 medium cucumber, diced
1 medium red bell pepper, diced
1 can garbanzo beans (also known as chickpeas), drained well
1 can red beans, drained well
1 can black beans, drained well
1-2/3 to 2 cups cooked and cooled quinoa
1 small bunch kale, torn into bite-size pieces
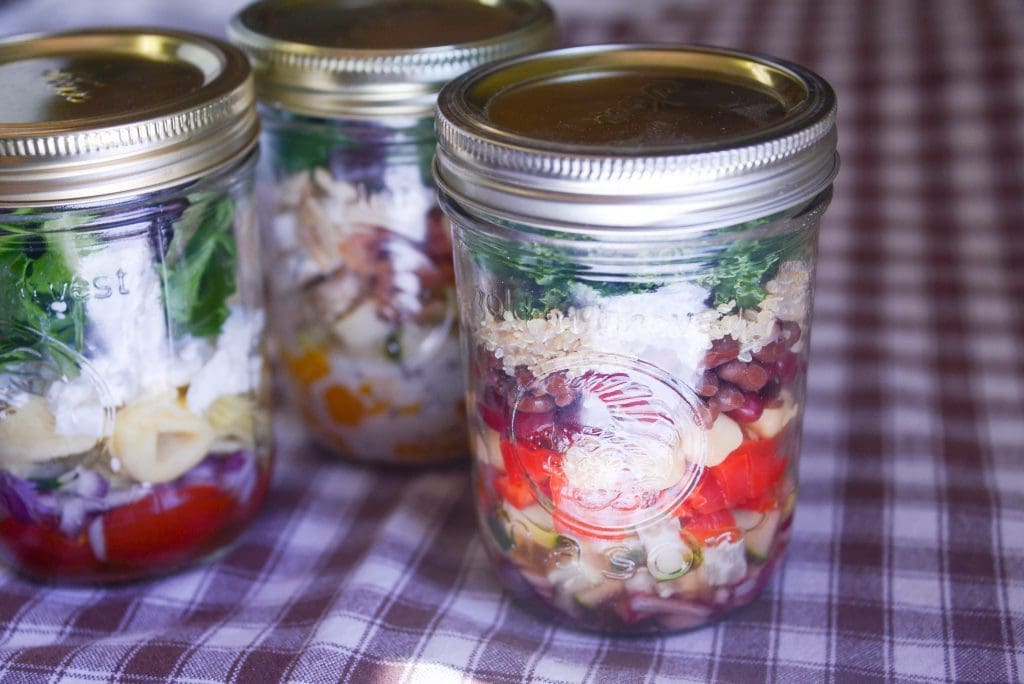
Directions

Mix vinegar and olive oil well. Place about 3 tablespoons dressing in each jar. Then divide remaining prepared ingredients evenly among the jars: chopped onions first, then cucumber, bell pepper, garbanzo beans, red beans, black beans, quinoa, and finishing with kale.
BEAN and KALE SALAD (serves 5 to 6)
Ingredients
5 to 6 canning quart-size wide-mouth canning jars
5 tablespoons red wine vinegar
7 tablespoons extra virgin olive oil
1 red onion, chopped
1 medium cucumber, diced
1 medium red bell pepper, diced
1 can garbanzo beans (also known as chickpeas), drained well
1 can red beans, drained well
1 can black beans, drained well
1-2/3 to 2 cups cooked and cooled quinoa
1 small bunch kale, torn into bite-size pieces
Directions
Mix vinegar and olive oil well. Place about 3 tablespoons dressing in each jar. Then divide remaining prepared ingredients evenly among the jars: chopped onions first, then cucumber, bell pepper, garbanzo beans, red beans, black beans, quinoa, and finishing with kale.