


The following comes from Evalogue.Life. To read the full article, CLICK HERE.
If you are wondering how to digitize slides, photos, audio, and other heirlooms you have come to the right place. In our work telling people’s stories, we do a LOT of digitizing of old media. We often have to quickly get through boxfuls of material, digitize photos, and capture large amounts of reference information. Sometimes we need the highest quality we can get, while other times efficiency is the name of the game. This article is an overview of the field-tested methods we use, organized as 12 tips.
(Disclaimer: This page contains a few affiliate links which means if you purchase a product on Amazon with our links, we make a small commission. We really appreciate it! This is a tiny part of our income, but every bit helps.)
Here is an index of what is covered in this article:
- Digitize slides and other media for free at FamilySearch centers, genealogy societies, and public libraries
- Digitize slides with a slide imaging gadget
- Test a few images before you do a whole batch
- Digitize cassettes with a cable and Audacity or Twisted Wave
- Digitize cassettes with a USB capture unit
- Scan photos with your printer
- Use photo scanning apps to digitize images and remove glare
- Take photos of scrapbooks and other family heirlooms with your phone or tablet and a light box
- Take photos of images outside on a cloudy day
- Scan stacks of photos and documents with a feed scanner
- Use OCR technology with a feed scanner to convert documents to text
- Use archival weights and white gloves
- Transcribe audio using slick technology tools
- Transcribe letters and articles using speech-to-text
- Digitize slides beautifully by sending them to the professionals. The same goes for images, audio, and video
- Professional Photo restoration
Tip #1 – Digitize slides and other media for free at FamilySearch centers, genealogy societies, and public libraries:
Many family history centers have flatbed scanners and other equipment to digitize slides, and cassettes for free. Call ahead to find out the equipment they have, and make an appointment in advance. For example, here in Utah some of the family history centers have They may even have specialty equipment such as a large format scanner for blueprints.machines that can digitize slides by the entire carousel in a matter of minutes. Make an appointment and you’ll get an hour on the machine. Here is a full article by FamilySearch about free services to scan photos.
Also, their flatbed scanners are ideal if you want high resolution images and friendly staff to help you use the equipment. Some also have light boxes or equipment to digitize cassette tapes. Make sure to plan your time so you will be able to digitize everything you need.
Related tip: also try your university library and/or the special collections department for scanning equipment Local universities are often seeking local history and will help you digitize important items. They may even have speciality equipment such as a large format scanner for blueprints.
Related tip: Did you know most U.S. public libraries and universities have subscriptions to Newspapers.com? If you need to research old newspapers, you can do it without having to pay for a subscription by taking a flash drive to your local library.
Related video – tutorial replay from a class on how to organize a large writing project
Tip #2 – Digitize slides with a slide imaging gadget:
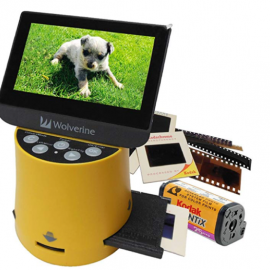
If your slides are not the super thick kind and if you do not need high-resolution images, you can digitize slides using a home imager. Many consumers are happy with the ability to get through a lot of slides quickly. Wolverine Titan is generally considered the best entry-level scanner. These are not scanners, but rather, take photos of the slides. I equate this to using a light box/ShotBox (see below). It gets the job done efficiently, especially if you have a large quantity to do. Just don’t expect to get high-resolution images. This method is generally adequate for 4 x 6 prints, or sharing on social media. It would also be useful if you want to see what’s on all your slides so you can focus your high-resolution scanning on the ones that matter most. If quality is important to you, then bite the bullet and either send your slides out to a service, or invest in more professional equipment. (Note: Gaylord Archival wrote a good article on how to preserve slides. You can read it here.)
Related article from a colleague – Apps for scanning negatives
Tip #3 – Test a few images before you do a whole batch:
To read the full article, CLICK HERE.